Node.js and Raspberry Pi
Raspberry Pi is a small, multi-use computer.
With Node.js you can do amazing things with your Raspberry Pi.
What is the Raspberry Pi?
The Raspberry Pi is a small, affordable, and amazingly capable, credit card size computer.
It is developed by the Raspberry Pi Foundation, and it might be the most versatile tech ever created.
Creator Eben Upton's goal was to create a low-cost device that would improve programming skills and hardware understanding.
Due to the small size and price of the device, it has become the center of a wide range of projects by tinkerers, makers, and electronics enthusiasts.
Raspberry Pi and Node.js
The Raspberry Pi has a row of GPIO (General Purpose input/output) pins, and these can be used to interact in amazing ways with the real world. This tutorial will focus on how to use these with Node.js.
What Do I Need?
For this tutorial you need a Raspberry Pi. In our examples we use a Raspberry Pi 3, but this tutorial should work for most versions.
Hardware needed:
- Raspberry Pi computer
- MicroSD memory card (We recommend a class 10 with 16 GB or higher)
- MicroSD to SD memory card adapter (usually included with the MicroSD card)
- Micro USB power supply to power the Raspberry Pi (2.5A or greater recommended)
- WiFi/Ethernet Cable connection for the Raspberry Pi (Not needed for Raspberry Pi 3 as it has built in WiFi)
- A working computer with internet and SD memory card reader (used to get the OS (Operating System) for the Raspberry Pi onto the memory card). In our tutorial we use a Windows computer for this, but you can use a Mac or Linux computer if you prefer
- HDMI monitor, USB keyboard (we need these only temporarily for the first boot of the Raspberry Pi)
For later chapters in this tutorial we will use special sensors or devices that we connect to the Raspberry Pi. We will specify these as special requirements in the relevant chapters.
If you already have a Raspberry Pi set up with Raspbian, internet and enabled SSH, you can skip to the step "Install Node.js on Raspberry Pi".
Write Raspbian OS Image to MicroSD Card
Before we can start using our Raspberry Pi for anything, we need to get a OS installed.
Raspbian is a free operating system based on Debian Linux, and it is optimized Raspberry Pi.
Download the latest Raspbian image from https://www.raspberrypi.org/downloads/raspbian/ to your computer.
We use the "LITE" version in our tutorial, since we are setting the Raspberry Pi up as a headless server (we will connect to it through SSH, without having a keyboard/display connected to it). You can use whichever version you want, but this tutorial is written with the "LITE" version as its focus.
Insert the MicroSD memory card in your computer (via the SD adapter if needed). Open File Explorer to verify that it is operational.
Etcher is a program for flashing images to memory cards. Download and install Etcher from: https://etcher.io/
Launch Etcher:

Click "Select image" button and find the Raspbian zip file that you downloaded.
Click the "Select drive" button and specify the memory card as the target location.
Click the "Flash!" button to write the image to the memory card.
After Etcher is finished writing the image to the memory card, remove it from your computer.
Set up Your Raspberry Pi
To get the Raspberry Pi ready to boot we need to:
- Insert the MicroSD memory card into the Raspberry Pi
- Connect the USB keyboard
- Connect the HDMI cable
- Connect the USB Wi-Fi adapter (or Ethernet cable). Skip this step if you are using a Raspberry Pi 3
- Connect the micro USB power supply
- The Raspberry Pi should now be booting up
When the Raspberry Pi is finished booting up, log in using username: pi and password: raspberry
Set Up Network on the Raspberry Pi
If you will use a Ethernet cable to connect your Raspberry Pi to the internet, you can skip this step.
For this section we will assume you have a Raspberry Pi 3, with built in WiFi.
Start by scanning for wireless networks:
pi@raspberrypi:~ $
sudo iwlist wlan0 scan
This will list all of the available WiFi networks. (It also confirms that your WiFi is working)
Now we need to open the wpa-supplicant file, to add the network you want to connect to:
pi@raspberrypi:~ $ sudo
nano /etc/wpa_supplicant/wpa_supplicant.conf
This will open the file in the Nano editor. Add the following to the bottom
of the file (change wifiName and wifiPassword with the actual network name and
password):
network={
ssid="wifiName"
psk="wifiPassword"
}
Press "Ctrl+x" to save the code. Confirm with "y", and confirm the name with "Enter".
And reboot the Raspberry Pi:
pi@raspberrypi:~ $ sudo reboot
After reboot, log in again, and confirm that the WiFi is connected and working:
pi@raspberrypi:~ $ ifconfig wlan0
If the WiFi is working propery, the information displayed should include an IP address, similar to this:
inet addr:192.168.1.50
Write down that IP address, as we will use it to connect to the Raspberry Pi via SSH.
Enable SSH, Change Hostname and Password
Now your Raspberry Pi is connected to the internet, it is time to enable SSH.
SSH allows you up use the Raspberry Pi without having a monitor and keyboard connected to it.
(You will need a SSH client for this on your non-Raspberry Pi computer. We use
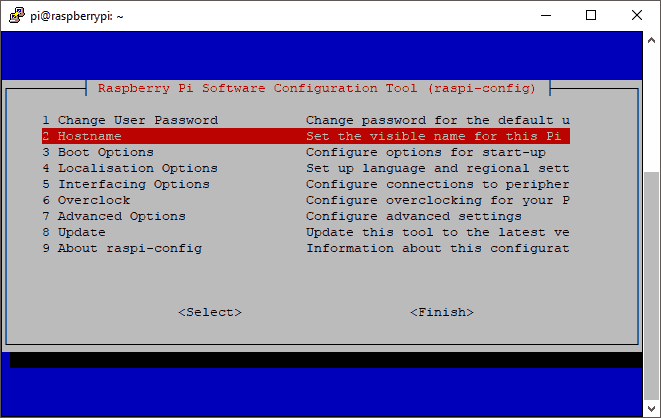
Open the Raspberry Pi Software Configuration Tool:
pi@raspberrypi:~ $ sudo raspi-config
You should see a menu like this:
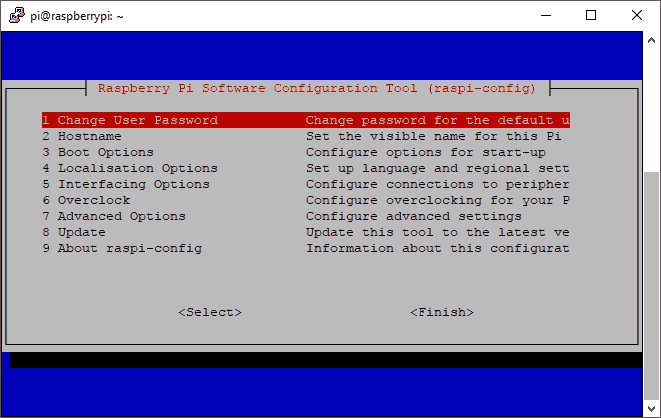
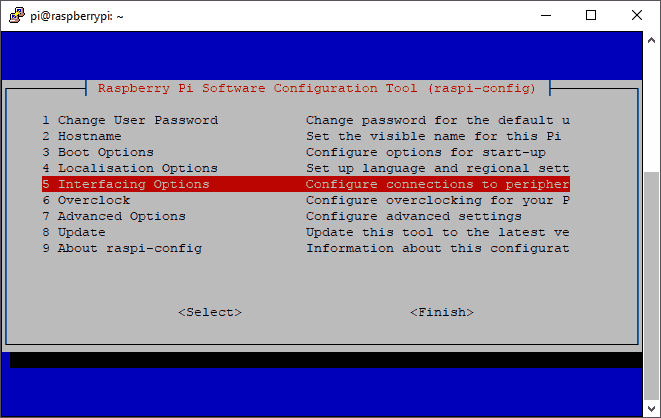
Select option 5 Interfacing Options:
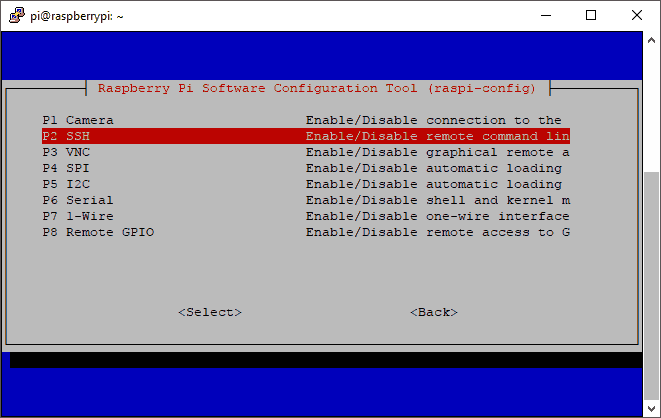
Select option P2 SSH, to activate SSH:
Confirm with YES, to activate SSH:
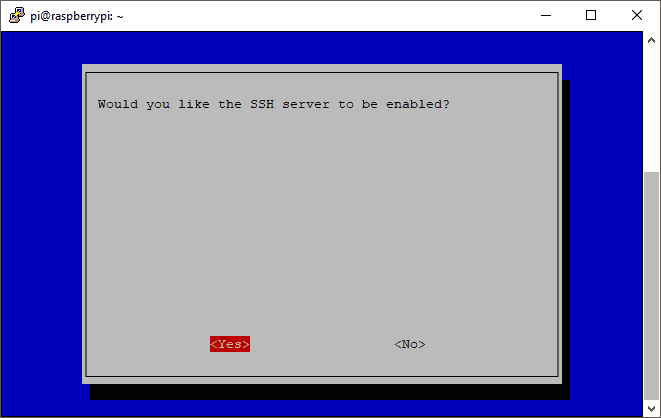
SSH is now enabled, and you should be in the main menu again.
Select 1 Change User Password, and follow the instructions to change the password. Choose a secure password, but something you will remember:
After you have finished changing the password, you should be back in the main menu.
Select 2 Hostname, and follow the instructions to change the hostname:
After you have finished changing the hostname, you should be back in the main menu.
Now we will close the menu and save the changes:
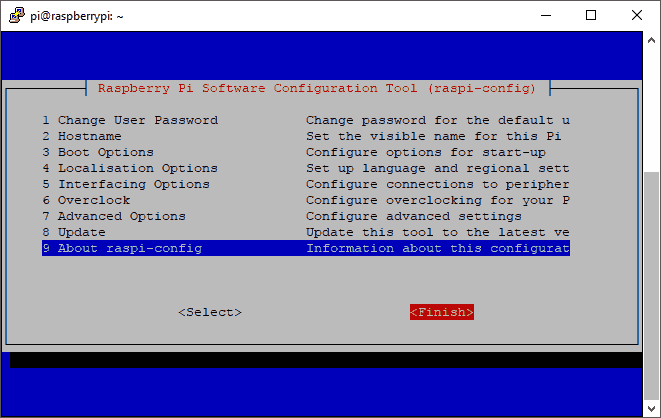
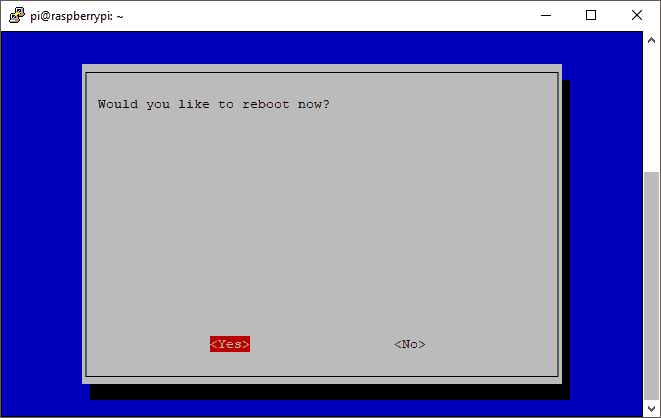
When selecting Finish, you will get the option to reboot. Select Yes to reboot the Raspberry Pi.
You can now unplug the monitor and keyboard from the Raspberry Pi, and we can log in using out SSH client.
Open PuTTY, type in the IP address for your Raspberry Pi, and click Open:

Log in using the username pi and the new password you specified.
You should now see a command line like this: (we used w3demopi as our hostname)
pi@w3demopi:~ $
You are now able to run your Raspberry Pi in "Headless-mode", meaning you do not need a monitor or keyboard. And if you have a WiFi connection, you do not need a ethernet cable either, just the power cable!
Install Node.js on Raspberry Pi
With the Raspberry Pi properly set up, login in via SSH, and update your Raspberry Pi system packages to their latest versions.
Update your system package list:
pi@w3demopi:~ $ sudo apt-get update
Upgrade all your installed packages to their latest version:
pi@w3demopi:~ $ sudo apt-get dist-upgrade
Doing this regularly will keep your Raspberry Pi installation up to date.
To download and install newest version of Node.js, use the following command:
pi@w3demopi:~ $ curl -sL https://deb.nodesource.com/setup_8.x | sudo -E bash -
Now install it by running:
pi@w3demopi:~ $ sudo apt-get install -y nodejs
Check that the installation was successful, and the version number of Node.js with:
pi@w3demopi:~ $ node -v
Get Started with Raspberry Pi and Node.js
Now you have a Raspberry Pi with Node.js installed!
If you want to learn more about Node.js, follow our tutorial: https://www.w3schools.com/nodejs/
In the next chapter we will get to know the GPIO and how to use it with Node.js.
